Making pizza!

by Vicky Pizza is a big favourite in our house. If the boys had it their way we'd be eating it every day. We often make our own pizza from scratch, including the dough. My husband has perfected his dough technique using a great recipe we found on A Peek Inside the Fishbowl.

Whenever we do make home made pizza, I give Joel his very own mini pizza to decorate. I put all the ingredients in small bowls and let him decide what he wants on it. It's a great activity which gets him involved in cooking without a lot of the mess. He's always eager to eat a meal he helped prepare!

Do your kids help you make pizza?

Vicky is the mom to 4 year old son named Joel and 19 month old daughter named Mieka. You can read her blog at blog Some Kind of Mom.

Vegetables - the easiest recipe EVER

by Lara I don't mind cooking, but there is little more frustrating than slaving over a meal only to have all of your children spit it out in disgust; refusing to eat a single bite. That meal they devoured last week? This week -  apparently revolting. Fun times!

Although they would happily exist on cheese, yogurt and bananas, I do try to mix things up a bit for them. Vegetables often aren't a hit - drizzle them in butter or cheese and they are no better. Generally if I want them to eat vegetables I need to use "the trick".

I think my mother in law first told me about it - her "Kiernan ate a TON of peas today" me "really??" her "ya, he really likes frozen peas" me "interesting. I'll have to try that. How do you cook them?" her "no, he likes them frozen".

Oh of course! He won't eat my cooking but FROZEN PEAS? OK WACKY KID.  But whatever works right?

Here's the thing, it wasn't just Kiernan! All three of my kids will happily munch down on tons of vegetables, if I give them to them right out of the freezer like popcorn.  Cook them, or god forbid they thaw them a bit and they aren't good.  But hard as rock peas, corns and carrots - YUMMO!

And ever since Jamie Oliver's food revolution taught me that frozen vegetables are actually really healthy, I feel like mother of the year as I throw some frozen vegetables in a bowl for dinner and forego cooking all together!

Lara is mom to 4 year old Kiernan and 1 year old twins Quinn and Juliette. You can read her blog at Gliding Through Motherhood.

Holiday Baking

by Krista From a very early age, my children have shown a keen interest in cooking, and helping me cook. I've embraced this, as they tend to eat more of what we serve if they have had a hand in creating it. Today we baked some shortbread cookies for Christmas, and they jumped at the chance to help out. While I am not worried about convincing them to eat cookies, it was really easy to include them at every step of the process. It turned in to a really fun morning for the family as we get ready for the holiday.

The recipe that we made is my grandmother's recipe, and I LOVE it, because it is really simple - it only has three ingredients! I find that simple recipes are best when baking with my little ones, it helps to keep us all focused. If there is any prep that I can do in advance, like cutting of the cherries that go on top of the cookies, or packing the icing sugar, I try to do that before they start helping me. We started by having them get out the ingredients, then sugar and butter get creamed together.

Pouring the icing sugar Creaming the butter and sugar

When it came time to add the flour, Woo measured and Goose poured. This works really well if your recipes don't need precise measurements. We work on the "-ish" rule for most things, so it doesn't matter if the cups of flour are not quite level, or if some of the flour misses the bowl.

One measures... One pours!

We stopped for Daddy to do a little clean-up at this point, as there was a good layer of flour covering the table. I then worked in the dough, and rolled it into balls. Woo wanted to help at this stage, and I was actually quite impressed with how well he could form the little balls.

Master Roller

Turns out that their thumbs are the perfect size for the thumbprint that the cherry rests in. They eagerly (and sometimes a little too over zealously) shmushed all the dough balls and added the cherries.

Perfectly sized Helping

We timed it so that there were trays of cookies to be shmushed and have cherries added while the first batch was cooking. Once that cooled, it was time to eat!

Chomp! Yummy! We have more baking planned in the coming weeks, with sugar cookies up next! The recipe, if you are interested is:

1lb salted butter, softened 1.5 cups of icing sugar, well packed 3-4(ish) cups of pastry flour

Pre-heat oven to 300.  Cream butter and icing sugar until it appears crumbly.  Work in flour a little bit at a time, until the dough is stiff but still workable.  Roll into 1 inch balls and flatten with thumb (for a cherry) or a fork for a plain cookie.  Bake for 14-18 minutes until they are just turning golden.  Remove from pan and place on cooling racks immediately.  Taste.

Krista is married to Willy and mom to a 3 year old son, Woo, and 2 year old daughter Goose. You can find her at Life in the Hutch or on Twitter @kgraydonald

Sushi snacks

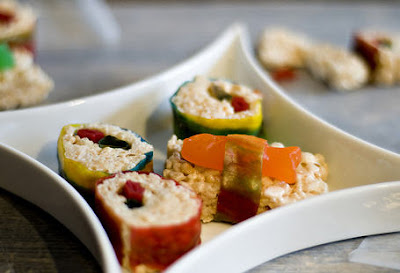
By Vicky Last month I stopped by my sitter's house as she was in the midst of bake-sale frenzy for her daughter's school. There were cookies, brownies, and cupcakes galore! Among the treats I spotted the most amazing thing of all - sushi! Joel was completely astounded. He ate 3 pieces and asked for more.

This wasn't your ordinary sushi, it was rice crispy treat sushi! I asked my sitter for the recipe, and it's so easy to do. You can get the kids to help, or make these for your next birthday party.

Here's what you'll need: -a batch of rice crispy cereal treats -licorice or gummy bears or fish shaped jube jubes -at least one box of fruit roll ups -parchment paper

Grab a couple of helpers and follow the recipes for Rice Crispy treats. Instead of putting them in a pan, roll them out into a rectangle onto parchment paper, on top of a cookie sheet, about half an inch thick. I found it helped to put another piece of parchment paper on top and then smooth them out by hand.

Next trim the edges.

Then lay the licorice (you could use worms or gummy bears too) across the rectangle, and roll up the edge into a tight roll. It helped to use parchment paper to roll it tightly.

Cut the roll and set it aside, and continue making more rolls.

Then wrap the fruit roll ups around each roll, you can overlap the segments ( or even use different colours) and slice them into rounds with a sharp knife.

Voila!

It's important to eat them with chopsticks, you know.

If you are feeling ambitious you can even try Nagiri style sushi using jube jube fish.

The kids will love them!

Vicky is the mom to 4 year old son named Joel and 1 year old daughter named Mieka. You can read her blog at blog Some Kind of Wondermom.

Tool Cake - Drill

by Sara My dad bakes all the birthday cakes for our boys.  He started baking cakes for the boys when the firefighter turned 2.  He has made a train, a front loader, a guitar, a milk tanker truck*, a camera (someone turned 30 this year), and a dinosaur.  Our family and friends have come to anticipate a different cake at every party.  He scours the Internet and books for ideas but now also has to appeal to the whims of the firefighter, who is 4, and likes to choose* the shape of his cake. 

Last year on my dad's birthday we made an aquarium cake.  We wanted to do something special for our master cake creator.  Plus, every so often, I like to show off my domesticity to my family.

We recently celebrated my dad's birthday and it was up to the firefighter and I to make him a cake.

I will admit to using a cake mix.  We prepared it according to the instructions but substituted 1/2 cup of applesauce for the 1/2 cup of oil.  After baking the cake I froze it so that it would be easier to carve and ice. 

Once the cake was frozen I cut it into three sections.  You have to work fairly quickly because it becomes more difficult to ice the cake as it thaws (bits of cake pull of with the icing).

We looked online for tool cake templates but couldn't find any.  Instead I found a simple clip art picture of a drill, enlarged it, and then printed it. 

I used each of the three sections of the cake for each section of the drill.  With the picture nearby I used a knife to cut the cake free-hand.  The firefighter stayed close-by to eat the cut-off bits of cake. 

After carving the top and middle we realized we had another section of cake so...

....we added a battery pack!

The firefighter had chosen sprinkles the day before so after icing the cake we did our best to replicate the different components of the drill. 

It took us less than half an hour to assemble and decorate the cake and Grandpa was thrilled with our creation.  And quite impressed at my ability to 'wing' cake creation and decorating.

Have you ever designed and created your own theme cake?

Sara is mom to 4-year-old ” firefighter” and 2-year-old “monkey”.  You can find her at her blog, My Points of View.

My Kids Funky Closet Sunday October 17th 10am- 3pm The Glebe Community Center 175 Third Ave @ Lyon St in The Glebe