Family Friendly Fiddleheads

One of my favourite things about spring is the gradual addition of fresh, local fruits and vegetables to our daily meal plan. One of the spring vegetables I particularly get excited about are fiddleheads.  If you have never eaten fiddleheads before or if you have seen them while strolling through the produce section at your local supermarket but hesitated to pick them up, you are in for a pleasant surprise!

Fiddleheads may look funny, but they taste good!

Despite this vegetable’s unusual curly appearance, fiddleheads are actually quite delicious. Their mild taste has been likened to that of asparagus or spinach, and cooked correctly their texture is crunchy, with a wee bit of leafy chewiness.  If your kids like their green vegetables then they should like fiddleheads.

Storing, preparing & cooking fiddleheads

Fiddleheads should be stored in the fridge and only stay fresh for a few days (I like to buy them the same day as I cook them). They are easy to prepare and cook.

Preparing fiddleheads:

1.      Fill your sink or a bowl with fresh, cold water

2.     Remove any brown outer scales with your hand or by using a cloth

3.     Trim or snap off the ends of the stems

4.     Rinse them again in cold water

Cooking fiddleheads:

Fiddleheads can be steamed, sautéed, stir-fried or (my favourite) barbecued.

How to BBQ fiddleheads

Simply put the washed and trimmed fiddleheads in a bowl and mix with a desired amount of olive oil (not too much, just a tbsp. or two depending how many fiddleheads you have), freshly squeezed lemon juice, minced garlic, and salt and pepper.

Stir until the fiddleheads are fully covered with the oily sauce then place them in tinfoil and fold until just a small portion of the fiddleheads can be seen (to let the steam out).  

Place on the BBQ at about 400 degrees for about 10 minutes or until the fiddleheads are bright green and soft in texture (a fork will easily pierce them). Be careful not to overcook them or they will become mushy.

Fiddleheads facts

Fiddleheads are high in omega 3 fatty acids, fibre, vitamins A and C as well as potassium, iron, manganese and Vitamin B Complex. They are also a great antioxidant food.

Fiddleheads are grown mainly in the east coast of Canada from ostrich ferns, so although there are several different varieties of ferns, including some grown in the woods or even in your garden they should not be consumed. Only expert harvesters can safely identify edible fiddleheads, so don’t just pick any old fern head and cook it up or you risk getting very ill! 

The fiddlehead season is very short – usually a month maximum (around April and May) and unlike some fruits and vegetables that gets imported you generally won’t see fiddleheads in stores if they are not in season. They grow quickly and must be picked the day they sprout – before they turn into full out ferns!

Fiddleheads are a delicious seasonal treat and I like to think of them as the kick off to local produce season! So, have are you a fiddlehead loving family like we are? I’d love to know your recipe! And if you haven't tried them yet - NOW is your chance!

Meals made easy - Culiniste

We get quite a lot of pitches at Kids in the Capital but when this one landed in my inbox I was particularly excited. The opportunity was to try out a service called Culiniste with a family-sized box. They describe themselves as a better way to cook with fresh ingredients and delicious recipes delivered to your door weekly.

How it works

Ingredients came sorted by recipe and really well insulated.

Ingredients came sorted by recipe and really well insulated.

Every week you get the recipes and ingredients delivered to your door for three recipes (you can choose if it's enough for two people or for four.) You then receive a box with all the ingredients in just the right proportions delivered to your door on Tuesday in a very well insulated and refrigerated box. Each recipe comes with step by step instructions to walk you through cooking each meal. I was also particularly impressed with how green the company is, including instructions on how each part of the package is recyclable and how to deal with them.

What did I think?

There are so many things about this service that I loved.

- The ingredients were fresh and high quality

Just the right amount of each ingredient

Just the right amount of each ingredient

- The ingredients came in just the right proportions. So often I want to make a recipe and only need two tablespoons of something I don't have. I end up buying an entire bottle of something, forgetting I have it, and then buying another bottle of it the next time a recipe calls for that ingredient. They send you everything you need (except olive oil) which I loved and found so convenient.

- The food was tasty and for the most part my kids liked it (admittedly, they wouldn't eat the kale). We had balsamic chicken, swedish meatballs with mashed potatoes and steak salad with baguette. The meals for four definitely had enough for our family of five with kids who don't have huge appetites.

- I liked that there was a good variety in the dishes available to choose from. Spicy, mild, vegetarian, and a mix of kinds of meats to choose from.

There are a few reasons that I wouldn't choose to have this service on a regular basis for my family though. It was a bit more work intensive than I expected. For example, the day we had meatballs I didn't expect I would have to make the meatballs from scratch. The shortest time I spent on the meals was about 30 minutes for the steak salad and the balsamic chicken took a full hour in the kitchen with almost constant tasks for me to do.

Who do I think this is good for?

People who love to cook from scratch with fresh ingredients but don't have the time to go out and get the ingredients easily. People who have a hard time coming up with good meal planning ideas or who struggle with not wasting food when they cook (I'm a big culprit in that department by not getting just the right proportions of things.) They definitely had enough kid friendly options to keep my fairly picky kids happy.

I would definitely get it again, just not every week. If you want to try it out, they've shared a discount code for $20 off your first order on their website. Use kidsinthecapital20 at checkout to take advantage and then let me know what you thought! 

Homemade Chocolate Pudding (cornstarch-free)

By Misty

You can't go wrong with pudding! Kids love the smooth, creamy texture, and you'll love how easy pudding is to make at home. Using full fat milk ensures kids are getting a big hit of vitamins and nutrients!

Nothing better than a cute little pudding face!

Nothing better than a cute little pudding face!

I adapted this recipe from Martha Stewart's chocolate pudding recipe, and attempted to make it a bit healthier. Some people have a hard time digesting cornstarch, and if you're concerned about genetically-modified foods, many corn-based products come from a GMO source. 

Cornstarch-Free Chocolate Pudding

1/2 cup sugar
1/4 cup arrowroot flour
1/8 tsp salt
1/3 cup unsweetened cocoa powder
2.5 cups full fat milk
4 large egg yolks
2 tbsps unsalted butter
1 tsp vanilla extract

1. Mix the sugar, arrowroot flour, salt and cocoa powder in a saucepan off the stove. Very slowly whisk in the milk, little bits at a time to prevent clumps from forming. Whisk in the egg yolks.

2. Cook over medium heat, whisk constantly (yes, constantly! Work those muscles!). As the liquid reaches the boiling point, it will suddenly turn into a solid creamy mass of pudding - kids love this, as it's magic! Reduce heat to low, and cook for 1 minute, while still whisking. 

3. Remove from heat and melt in butter and vanilla extract. Serve warm, or cover with plastic wrap and place in the fridge for 3 hours to cool. Martha suggests placing the plastic wrap right on top of the pudding to prevent a skin from forming - great tip Martha! :)

Serve plain or with whipped cream. Enjoy!

Weekend Recipe: Hawaiian Meatball Kebabs

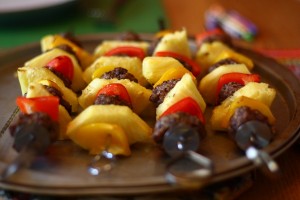
We love Hawaiian meatballs - the sweet/sour flavour of the sauce, and fresh pineapple is really popular with my kiddos! I tried making these into kebabs the other day when it was hot enough that I wanted to turn off my oven and turn on the bbq! I made the meatballs ahead of time in the morning when it was cooler, and put the kebabs together later. You could probably cook the meatballs on the bbq too if you had a good pan!

hawaiin meatball kabobs

Hawaiian Meatball Kebabs

Meatballs:

1lb ground meat (we used lamb) 1 egg 1/2 cup bread crumbs 1/2 tsp minced fresh garlic (more if you like your meatballs garlicky!) 1/2 tsp salt 1/2 tsp pepper

Mix all ingredients together in a big bowl (squishing with a fork works well). Form into 1-inch balls and place on a cookie sheet. Bake at 375 degrees F for 15-20 minutes, turning them over halfway through baking.

Kebabs:

1 pepper cut into large chunks (we used red and yellow) 1 fresh pineapple, cut into large chunks Batch of cooked meatballs (see above)

Grab your kebab skewers and alternate a cooked meatball, piece of pepper and piece of pineapple until the skewer is full. Place on a pre-heated grill, and grill just until peppers are soft (I left them on for about 10 minutes - you want to make sure the meatballs don't get dried out!)

Hawaiian Sauce:

Most Hawaiian sauces are really high in sugar. This is because canned pineapple and the juice is used. I've used stock here instead to cut back on the sugar a bit. It's slightly more sour than sweet, but I liked it a lot better!

1.5 cups veggie or beef stock 2 tbsp low-sodium soy sauce 3 tbsp vinegar 1/4 cup brown sugar or honey 1/2 ground ginger 2 tbsp cornstarch

Whisk all ingredients in a saucepan. Heat until the sauce thickens, usually about 20 minutes.

Take the kebabs off the bbq, and serve with rice. Pour a spoonful of the sauce over the whole place! Bon Appetit!

Strawberries, strawberries, everywhere!

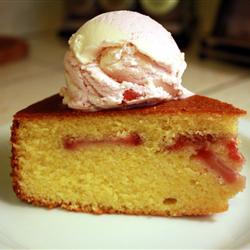
They're falling off the plants, and making their way onto our plates. I LOVE strawberry season. We try our very best not to purchase strawberries from the US, because it's just so lovely waiting for the delicious local strawberries to arrive in season. The flavour is so much better! Last night I scoured my recipe books for a quick strawberry cake I could make for dessert, and came across this one from Vegetarian Planet by Didi Emmons. If you're going for healthy, this is definitely not a good choice :) But, I did cut the sugar back to 3/4 cup, and it was definitely sweet enough!

strawberry cake

Cornmeal Strawberry Cake

1 1/3 cups cornmeal 2/3 cup unbleached white flour 1/2 tsp salt 1 tsp baking powder 3/4 cup unsalted butter, softened 1 1/4 cups sugar 4 large eggs, beaten 1 tsp vanilla extract 1/2 cup buttermilk (or yogurt) 1 cup sliced strawberries

Preheat oven to 350, and grease a 9 in cake pan. In a large bowl mix together cornmeal, flour, salt and baking powder.

In another bowl, mix butter and sugar (don't cream them). Stir in half the beaten eggs and mix. Stir in the rest of the eggs and mix well. Add the vanilla to the buttermilk. Add half the flour mixture to the egg mixture, and stir well (do not beat). Add the buttermilk and stir again. Then add the remaining flour mixture. Fold in the strawberries and pour the batter into the pan.

Bake for 45 to 50 minutes, until a knife inserted comes out clean.

Serve with ice cream, whipped cream or greek yogurt!