Step-by-Step Instructions for Flour Tortillas

Kids seem to love flour tortillas - my daughter definitely prefers the thin, flexible flatbread to a traditional sandwich. They're also so versatile - you can stuff them with any kind of protein, tons of veggies, or use them for taco night.

flour-tortilla

But I have issues with store-bought tortillas. They're super soft, flexible and yummy, but only because they've been made with a number of additives and preservatives. Take, for example, this package of Old El Paso soft tortilla shells. If you click on the image, you'll be able to read the list of ingredients - the ones that concern me are basically everything but the flour, water and baking powder!

So I set out to make my own flour tortillas. I've heard that this can be really difficult, but other than the 45 minutes I need to get it done, I have had an easy time of it! Most likely it's the recipe I use, but I think more than anything, it's the instructions. So here I've included pictures of the process, as well as detailed instructions. This has gotten easier the more I've done it, and I find it's not taking me as much time. A full batch yields enough to last us about a week as a family of four. I call Sunday my "tortilla making day" :)

Ingredients

  • 4 cups of all-purpose flour

  • 1 tsp baking powder

  • 1 tsp salt

  • 2 tbsps of room temp butter, cut into cubes

  • 4 tbsps of vegetable oil shortening (a healthier choice would be lard!)

  • 1.5 cups of warm water

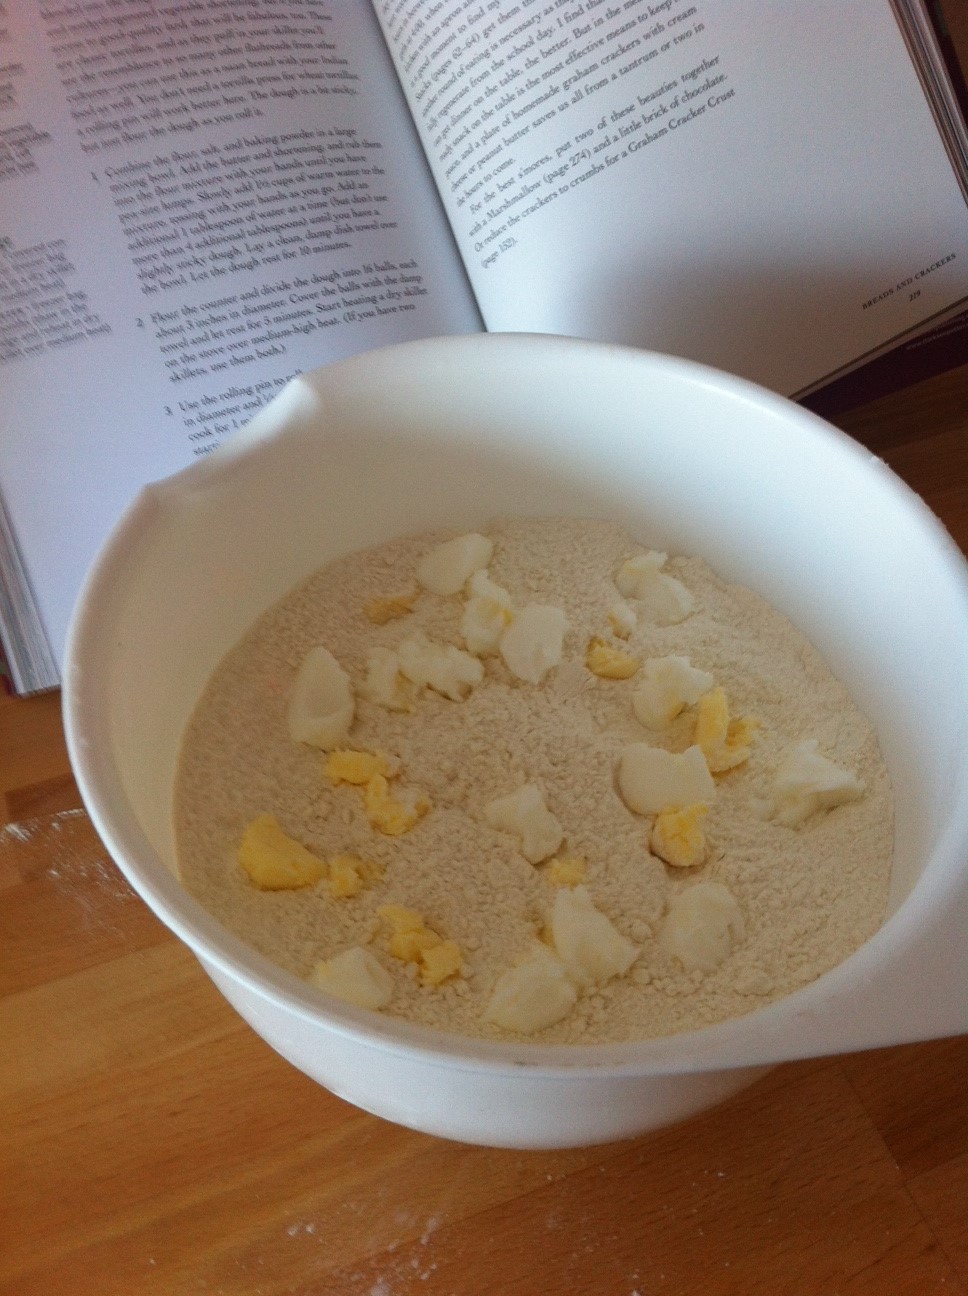
Step 1: Mix flour, baking powder and salt in a large bowl. Cut butter and shortening into smallish cubes and throw into your bowl of flour

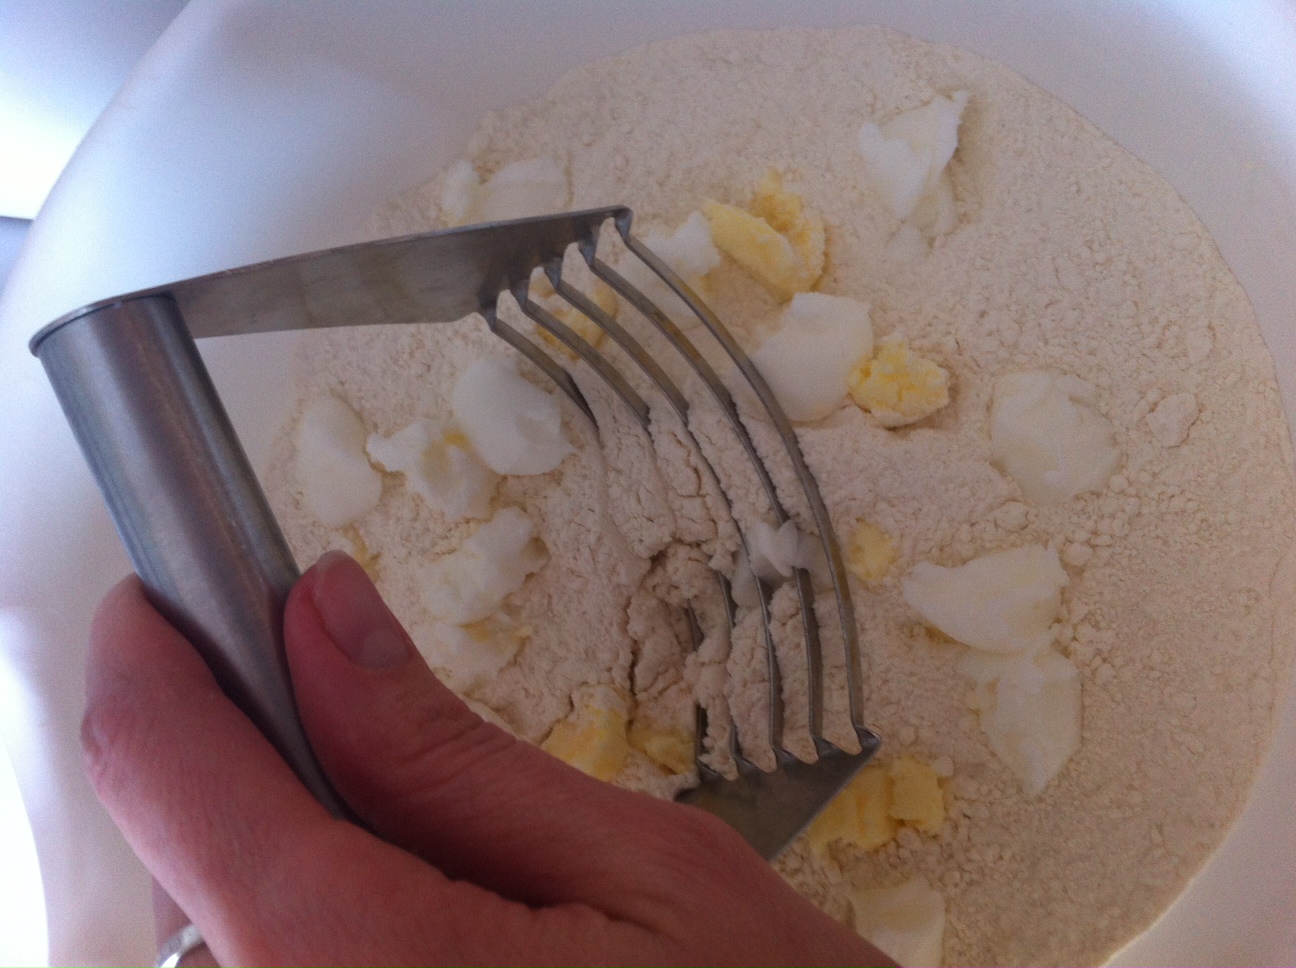
Step 2: Use a pastry cutter (or your hands, or 2 knives) to cut the fat into the flour. You want to do this enough that you end up with little pea-sized pieces of fat mixed in with the flour. Doesn't take much!

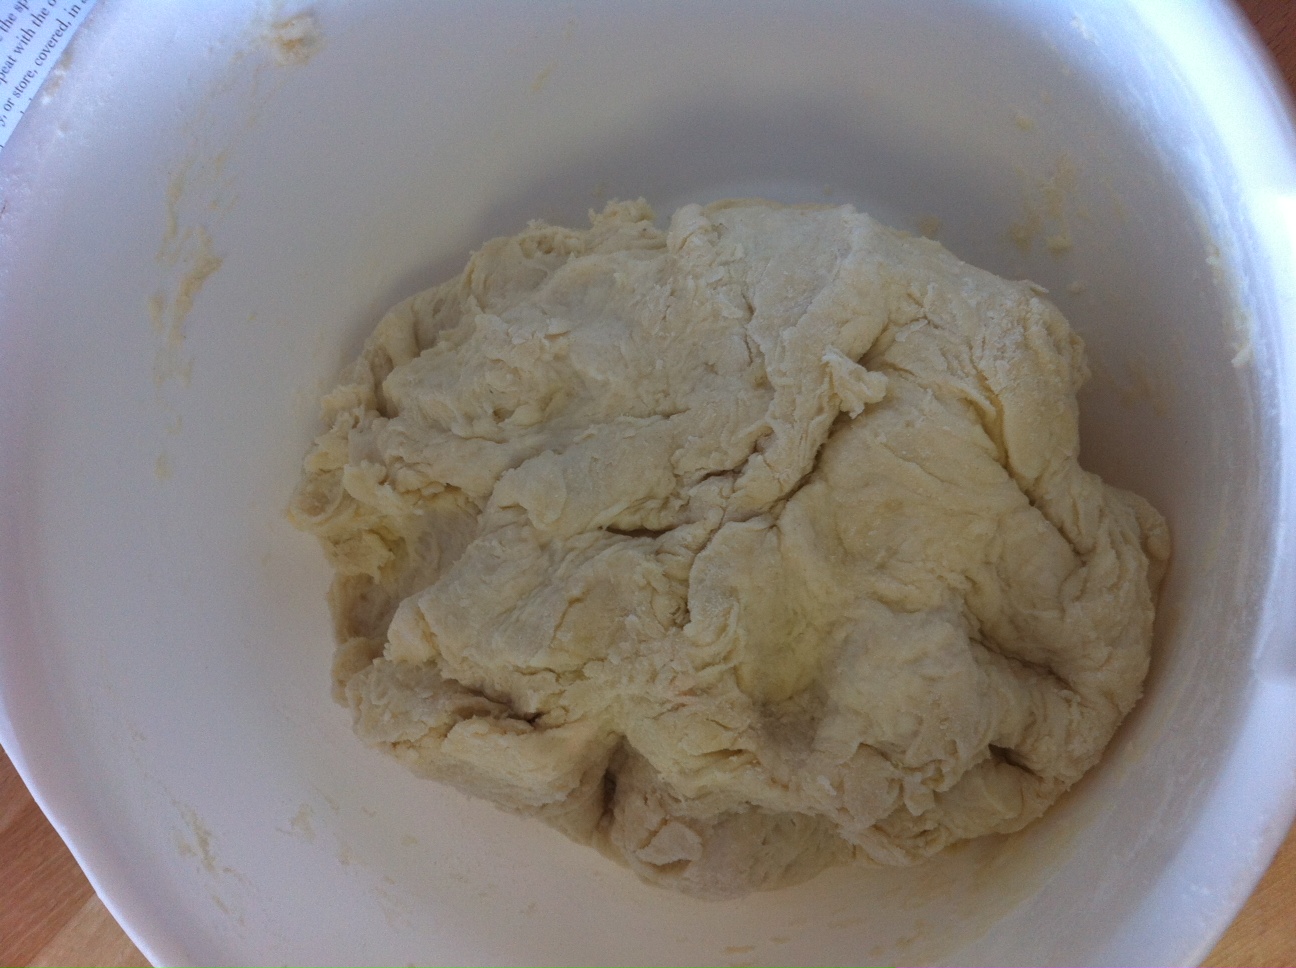
Step 3: Slowly pour in 1.5 cups of warm water, mixing as you go. I start with a wooden spoon, and then use my hands as the dough starts to form. Note: the dough will stick together, but it's ok if it's a bit flaky. If it's too sticky and wet, add 1 tbsp more flour. If it's too dry and won't form a ball, add 1-2 tbsps more water.

Step 4: Cover the dough with a damp tea towel, and go make yourself a cup of tea

Step 5: Separate the dough into 16 balls. Cover again with the towel while you heat up a non-stick frying pan on HIGH heat.

Step 6: sprinkle your surface with flour. I like to use a pastry mat!

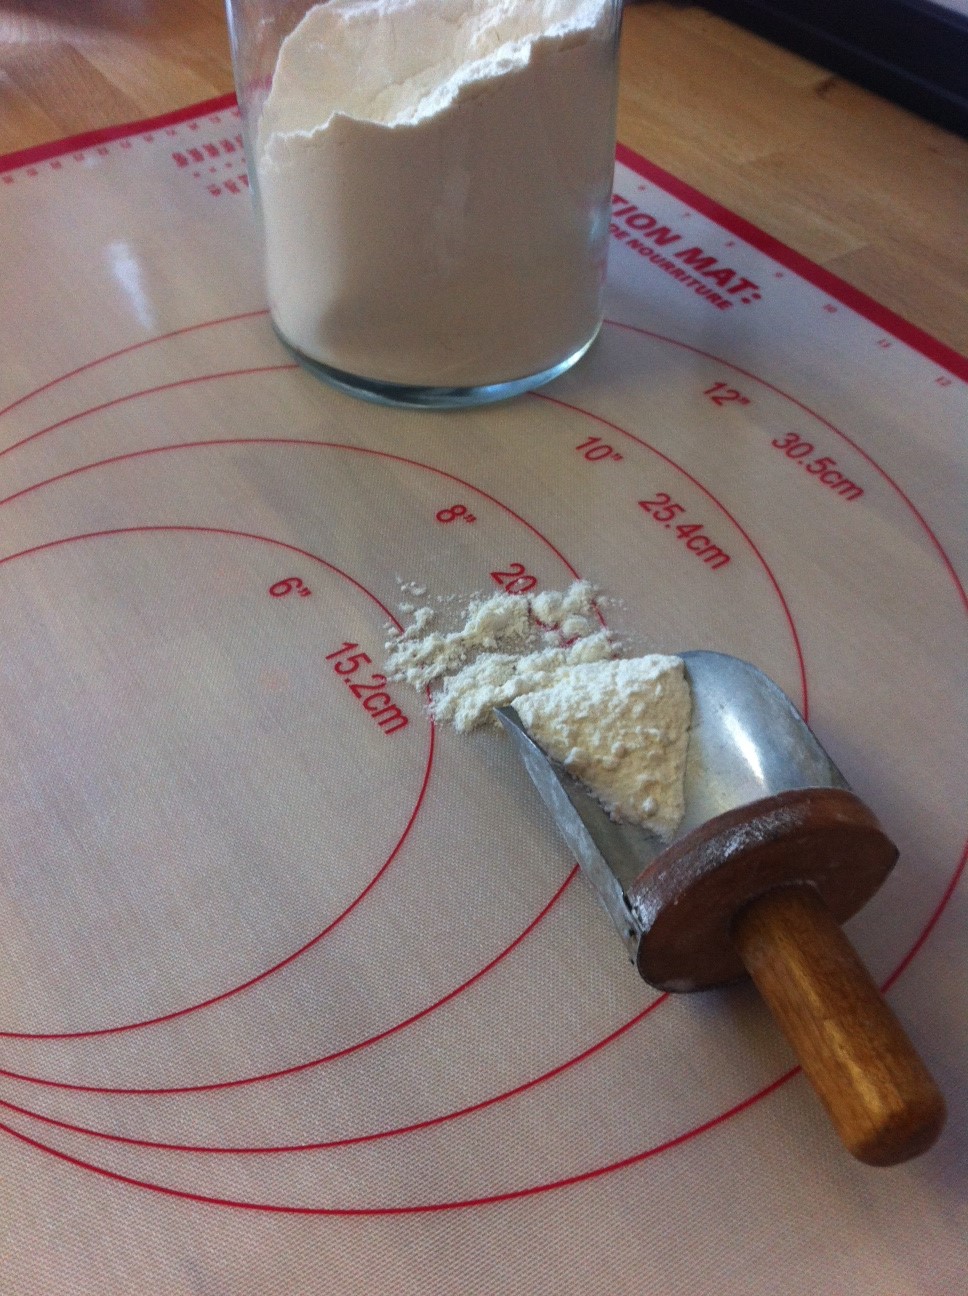
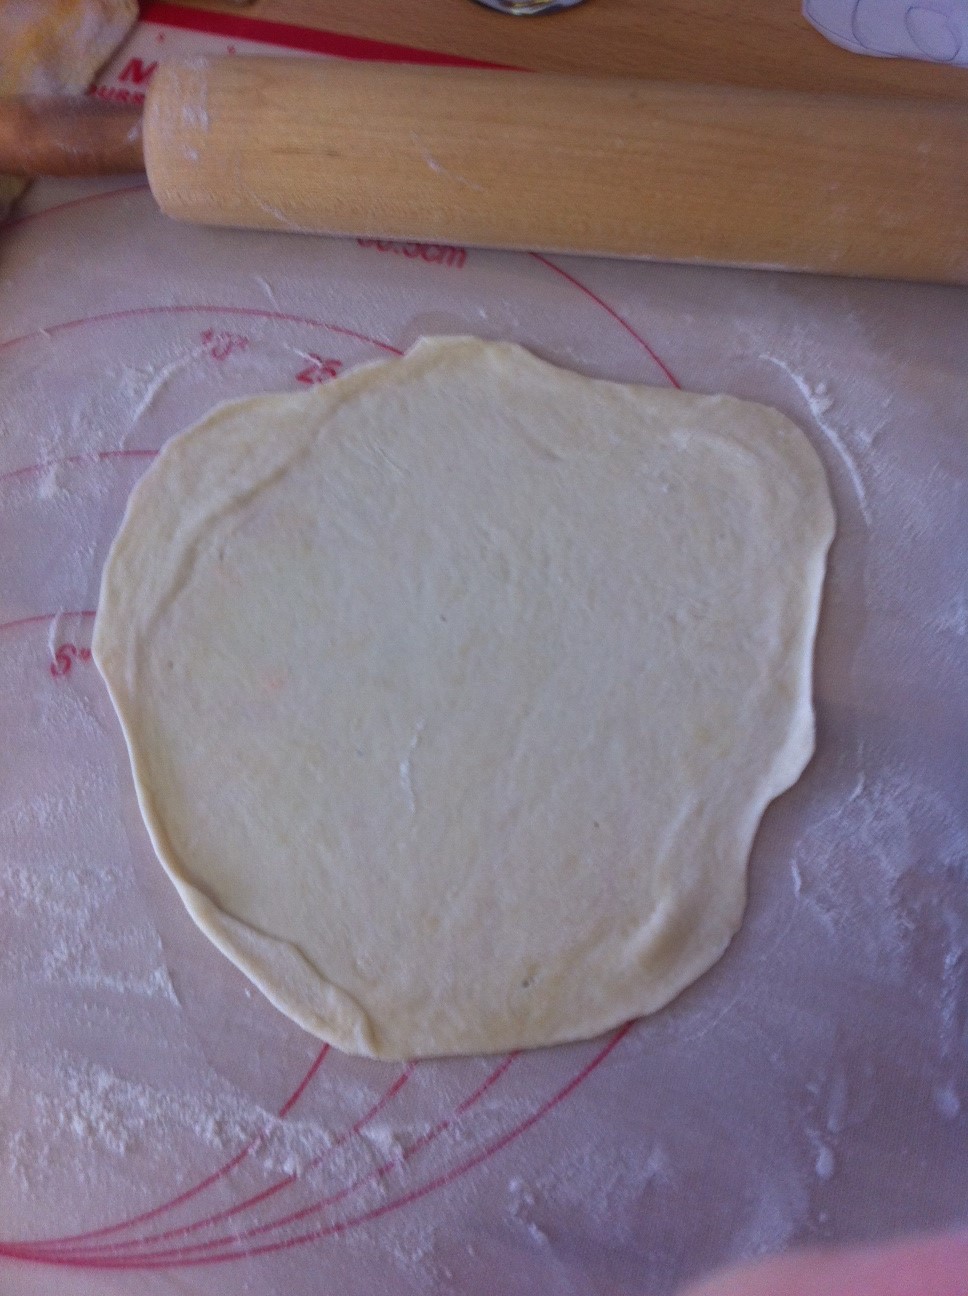
Step 7: Roll out your dough. It's very important that you get it VERY THIN...if it sticks to the mat, just sprinkle with a bit more flour

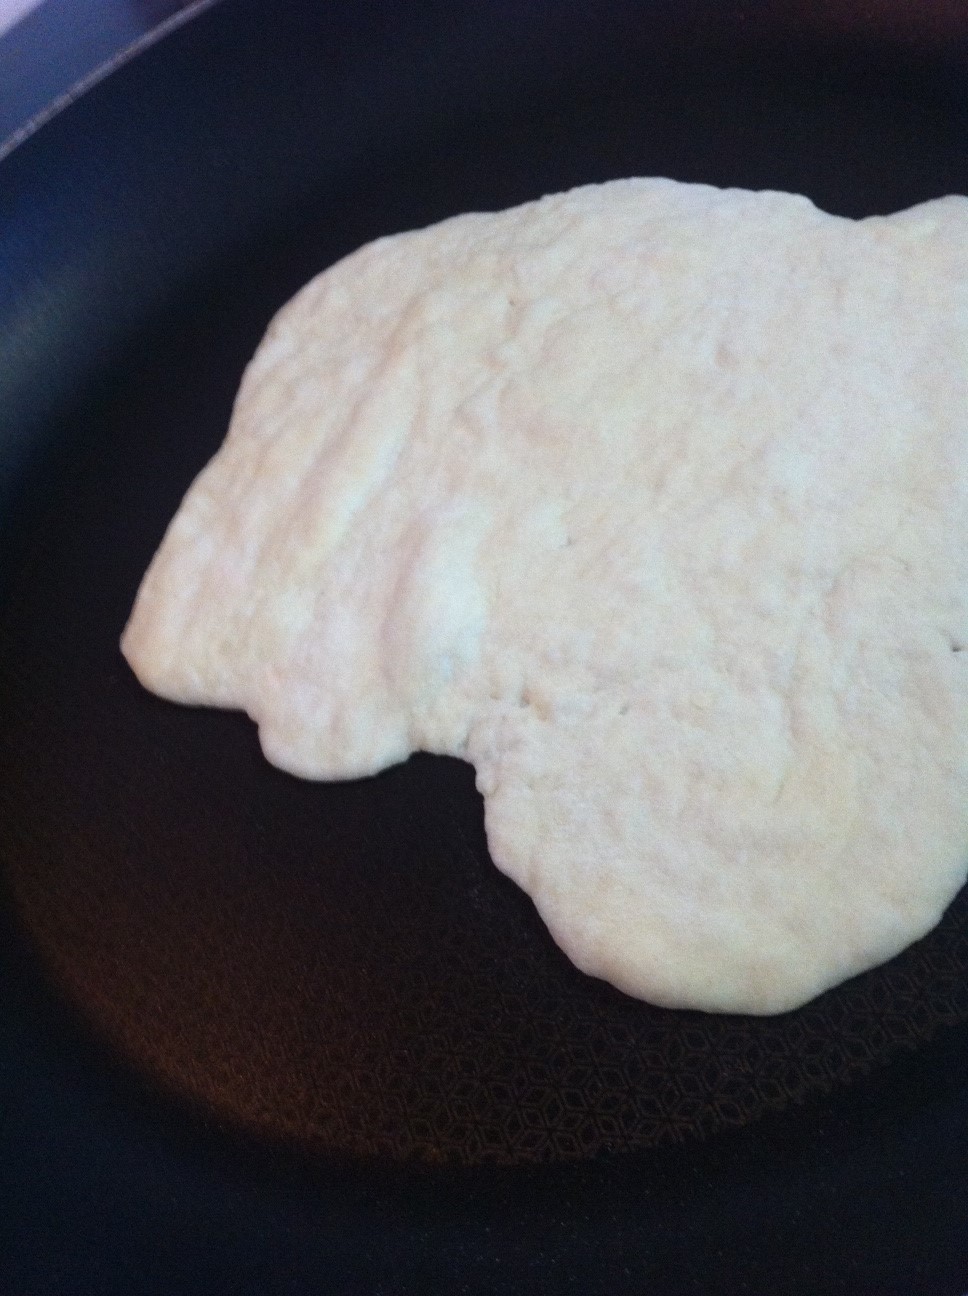
Step 8: Throw it into your hot pan, and watch it rise and bubble. Depending on how hot your pan is, this could take a mere 15 seconds or 45 seconds. Watch very closely, as they burn within seconds! Flip it once it bubbles, and toast on the other side for 10-15 seconds.

Step 9: Repeat! I've gotten good enough that I can throw one in the pan, and roll out another by the time that one has cooked. It takes practice :)

Step 10: Eat and enjoy! (tortillas freeze really well - we put waxed paper in between each one so that they don't stick or break)

Kid Approved: Recipe for Non-Dairy Yogurt

We're doing a food experiment in our house. We've long suspected that our daughter has some allergies (or, at least, intolerances - these are not life threatening). But we've been too tired and lazy to change much, other than limiting the amount of cow's milk that she drinks. She still consumes most other dairy products. We recently embarked on a strict diet with her, cutting out all dairy and any trace dairy in other foods (including casein). Lo and behold, we saw an improvement.

Despite the positive changes, I was finding the new diet a struggle. Our daughter's favourite foods include: cheese (all types), yogurt, sour cream and butter. She eats fruit, veggies and protein as well, but not with the same gusto.

So, my challenge has been to find some alternatives that are both tasty and don't break the bank. So far our one success has been fake butter. And no, I'm not talking about chemically-laden margarine laced with milk products; I mean this stuff - Earth Balance. Dairy-free AND soy-free, and given the thumbs up by picky kiddos everywhere!

Other products have been a giant failure. She hates Daiya "cheese," although we haven't tried to make pizza with the shredded variety yet. Another score for the garbage was coconut "yogurt." Blech!! It was jelly-like, a weird pale grey colour and FULL of sugar and additives. She also shunned my homemade almond milk, and still prefers the store-bought variety.

The holiday season arrived. We gave up for a couple of weeks and let her eat whatever she wanted, because food was everywhere, and I was tired of having nothing to offer her for snacks and/or lunch. There's only so much fruit, nuts and vegetable with hummus you can offer a kid before they ask for cheese and crackers.

Christmas day came, and Santa surprised me by leaving a big wrapped box under the tree. Inside I found a Blendtec blender, a kitchen gadget I've been swooning over for a while now. Other people spend hundreds of dollars on hair treatments, gym memberships, Ipads, Iphones and giant TVs. My weakness is kitchen gadgets.

Can I just say, this blender has truly changed my culinary life. Things that I've always dreamed of doing, I can now do in a matter of minutes!! I can make amazingly healthy smoothies, without all the floating chunkies that my hand-held blender used to leave. I can make all my own coconut milk and almond milk, and I can even blend up my favourite drinks (mmmm pina colada!!)

I've also discovered CASHEWS!! Almond milk is totally yummy, but a bit of a pain to make because you have to squeeze it through a nut bag (no, I'm not making this up). But cashews don't take any time at all. You soak them overnight, whiz them up with water, and voila!! Yummy, creamy, awesome milk. And the more digging I did, the more I discovered what I could make out of cashew milk.

In this post I'd like to share my successful Cashew Yogurt, adapted from this recipe at The Spunky Coconut.

First Step

Make the cashew milk! Soak nuts in water overnight, and then drain and rinse. Put them in your food processor or blender. Add 4 cups of water, 1/2 tsp vanilla and 1tsp honey. Blend until smooth and frothy.

Second Step

Bring the 4 cups of cashew milk to a simmer in a saucepan.

Third Step

Whisk in 2 tsp of Gelatin dissolved in boiling water (one packet of Knox Gelatin worked for me). The instructions of how to dissolve the gelatin are on the packet. The Spunky Coconut mentions a substitute for vegetarians, but I haven't tried it, so not sure if it would work.

Fourth Step

Let the milk cool until it reaches about 90-92 degrees F (having a good book nearby to wait while it's cooling is a good idea, or just put the whole pot in the sink with cold water)

Fifth Step

Whisk in 3.5 tsps non-dairy probiotic. I used Inno-Vite DDS Original powdered probiotics. Basically, you need about 30 billion colony forming units, so just read the label on your favourite probiotics.

Sixth Step

Put the yogurt into a yogurt maker, oven with the oven light on (I have a "proof" setting on my oven), or in a cooler with something to keep it warm in there....hot water bottles etc. I've heard the yogurt maker is the easiest, but it's one gadget I don't own. Leave the yogurt overnight.

Seventh Step

In the morning, pour the yogurt (it will still be quite runny) into a container and refrigerate. When it is completely cool, it should have set and be thick and yummy. Sweeten with maple syrup, add fruit, vanilla, whatever!! Enjoy!

Misty Pratt is a mother of two girls, 1 and 4 years old. In her spare time she is a doula and childbirth educator. Follow her on Facebook or find out about her services here.

Winter Soups: Chicken Tortilla

One of my favorite winter meals is soup. There is something warm and comforting about sipping a hot bowl of soup while the temperatures drop outside. I like to make big batches and freeze some for later. This makes it easier on the days that I just don’t feel like cooking (which, if I’m honest, is most days). One of my favorite (and easiest) soups to make is chicken tortilla soup. I love the slight spiciness and the crunch of the tortilla strips on top. I've found recipes that need you to mix all the spices together but one of my tricks is to use the canned tomatoes with the chili spices already mixed in.

Ingredients

2 tablespoons vegetable oil
1 small onion, diced
2 tablespoons minced garlic
3 cups low-sodium chicken broth
1 (14.5-ounce) can of chili spiced diced tomatoes
1 (14.5-ounce) can black beans, rinsed and drained
1 (8.5-ounce) can of corn, drained
3 raw chicken breasts, boneless and skinless cut into bite sized pieces
Salt and freshly ground black pepper
1 stalk of green onion for garnish
1 (8-inch) flour tortilla, grilled, cut into thin strips (or for us lazy ones, use the store bought tortilla chips, crushed)
1 cup shredded Monterrey cheese (optional - we aren't a cheese family here)
 

Directions

In a large saucepan heat the vegetable oil. Add the onions and cook for 2 minutes. Once the onions have softened add the garlic and cook for another minute. Pour the chicken broth, tomatoes, beans and corn into the pot and bring to a boil. Once at a boil lower heat to simmer and add your chicken breasts. Simmer soup for about 2-3 hours. The chicken will be nice and tender.

When you’re ready to serve, ladle the hot soup into bowls and sprinkle the chopped onions and tortilla strips on top. If you’d like, you can add the cheese (or not).

What's your favourite winter soup recipe?

Back-To-School Lunch Ideas

If you’re anything like me, you’re just about ready to do the back-to-school happy dance. I love the structure and routine of back to school - and truthfully, so do my girls. The one thing I hate - I mean hate with a passion - is making lunches. I have two very picky eaters, both allergic to nuts. They hate sandwiches, don’t eat cheese and turn up their noses at most veggies. So needless to say that making lunches for me really sucks.

This year, though, I'm trying to be proactive. I've been scouring the Internet, searching on Pinterest and asking lots of readers about their favorite recipes. Here are a few I've come up with.

Nut Free Oat Bars

High Fiber Oat Bar

High Fiber Oat Bar

These nut free oat bars are packed with fibre (shh....) and lots of other good stuff. The seeds make them crunchy (throw some chia seeds in there too!) and the honey and cinnamon give them a sweet and spicy flavor.

Banana Crunch Wraps

Banana-Crunch-Wraps

Banana-Crunch-Wraps

I found this one on Pinterest and showed it to my youngest (the one who may eat a sandwich if the feeling hits her). She gave it the thumbs up. It’s made with Wow Butter for those with nut allergies or for nut-sensitive schools but you could really make it with any type of nut butter. When it’s all rolled up, it reminds me of sushi and it’s easy to eat with your hands. I’m keeping this recipe close.

Mini Taco Pockets

Mini-Taco Pockets

Mini-Taco Pockets

I saw this on a site called Recipe by Photo and thought it was a great idea. My kids don’t eat sandwiches but they would eat these (I think) if they were warm and in a thermos. They’re made with crescent roll dough but I bet they could be made with homemade whole wheat dough for those of us who have the inkling to do so. They could be filled with just about anything but this mini taco idea sounds yummy to me. And I may be able to hide a vegetable inside!

Bento Box

Veggie Bento options

Veggie Bento options

The idea of a Bento Box may be just wild enough for my girls to try. Basically, a bento box is a lunch that is packed bento-box style containing a variety of different types of foods: carbs, protein, fruits, veggies and even a treat. Sort of like a lunchable - but healthy. The best part is that you can put bits and pieces of whatever your kids will eat in it. I think if I packed it with enough variety, in a really cool Bento box (and no cheese), we may be good to go. Here are some ideas of what to pack.

Well, that’s it. If you have any suggestion on lunch ideas, I’m all ears. Good luck to you as the kids head back to school.

Dark Chocolate Hazelnut Spread

They say that dark chocolate is healthy. I’m good with anyone or anything that gives me permission to eat chocolate so when I saw this recipe in Today’s Parent, I was sold! It looks yummy and actually pretty easy to make.

Here’s What you Need

  • 1/2 cup dark or semi-sweet chocolate
  • 3/4 cup hazelnuts, toasted
  • 2/3 cup sweetened condensed milk, such as Eagle Brand
  • 1 tablespoon honey
  • 1/8 teaspoon kosher salt

Here's What You Do

  • First, you need to toast the hazelnuts. It’s best to arrange them in a single layer on a baking sheet.
  • Bake the hazelnuts a preheated 350 degrees (F) oven for 15 to 18 minutes until lightly toasted. Cool completely.
  • Once cooled, put them in a clean dish towel and rub them until all the skins come off.
  • Place the chocolate in a small bowl and place over a saucepan of barely simmering water. Stir occasionally until the chocolate has melted and the mixture is smooth. Cool to room temperature.
  • Grind the nuts in a food processor until pasty. The nuts will be stuck to the sides of the bowl but just scrape down the bowl with a rubber spatula.
  • Add the condensed milk, honey and salt.
  • Blend well, scraping down the bowl as needed.
  • Add the cooled chocolate and pulse until combined.

That’s it! You’re done. Scrape it into a serving dish and enjoy with fruit, bread or on it’s own. I’m off to buy some hazelnuts to try this out. I’ll let you know how it tastes!