Kids learning to cook with Julianna Banana

Juliette with her strawberry shortcake. We rushed the final step and the whip cream went on to a still warm cake so while not as tidy as Juliette hoped, we were able to share a delicious dessert with family.   [image of a 12 year old white girl sitting at a table with her face down low, behind a green plate with a home made strawberry shortcake.]

Juliette with her strawberry shortcake. We rushed the final step and the whip cream went on to a still warm cake so while not as tidy as Juliette hoped, we were able to share a delicious dessert with family.

[image of a 12 year old white girl sitting at a table with her face down low, behind a green plate with a home made strawberry shortcake.]

Making sure my kids learn to cook from a young age has always been a priority for me - partially so I know they have the skills they need when they move out, but also so that I don’t have to do as much of the cooking while they’re still at home.

That’s one of the reasons that I love that Julianna Banana is all about teaching kids these skills - and teaching them way better than just how to make Kraft Dinner or how to throw a frozen pizza in the oven! :)

Juliette got to try out the Holiday box last December, and this month she got the Summer box (and even made her first unboxing video - see below!).

Julianna Banana aims to inspire kids and families to get baking, cooking and creating in the kitchen all while learning about food, having fun, and gaining an appreciation for the importance of community and giving back.

They provide culinary experiences for kids and families, ranging from Classes to Culinary Boxes for Kids which combine the fun of a class with a collection of kid-friendly recipe cards, kitchen tools, science activities and more.

What exactly is a culinary box?

Finished pizza ready to eat! [image of two 12 year olds standing in front of a patio door at night holding plates with pieces of the pizza they just made, ready to eat]

Finished pizza ready to eat!

[image of two 12 year olds standing in front of a patio door at night holding plates with pieces of the pizza they just made, ready to eat]

This box is a great mix of recipes, an experiment, an activity, kitchen tools, and support (you can join live online classes for some of the recipes!). My two 12 year olds were able to complete 3 of the recipes in a couple of days with very minimal support from me.

The Julianna Banana Summer Box contains

  • A collection of kid-friendly recipe cards and booklet, summer faves like homemade strawberry jam, strawberry shortcake, homemade pizza, charcuterie and more.

  • Locally sourced kitchen tools to get your junior chef cooking

  • Teacher-crafted food science activity ; the science of ice cream!

  • DIY Honey Lip Balm Kits; includes local HONEY 🍯 and Beeswax, tins, plus tags, gift pouch for gifting activity. Make one for a friend!

  • handmade fabric jam jar covers and accessories. Make some jam, jar it and gift it! Recipe, fabric, tags and ribbon included.

  • Julianna Banana Apron

  • Functional storage box to store tools and recipes

  • A complimentary LIVE virtual class August and September (we’ll make Pizza together), recipe included.

  • Recipe notebook and additional kitchen tool, plus FREE shipping to Ottawa provided with Subscriptions ( set of Summer, Harvest and Holiday Boxes)

  • Each one is individually curated and addressed to your junior chef.

A fundamental pillar of Julianna Banana is to support local businesses and to give back to the community. Materials in our Culinary Boxes including kitchen tools and accessories are sourced whenever possible from local vendors. Recipe cards are designed and printed in Ottawa and our Julianna Banana apron is made and printed in Canada.

Quinn adding the sugar to the strawberries as they made the jam  [image of a 12 year old white boy pouring sugar into a large pot of strawberries on a table top burner with a variety of kitchen tools around them and his sister’s arm in the corner]

Quinn adding the sugar to the strawberries as they made the jam

[image of a 12 year old white boy pouring sugar into a large pot of strawberries on a table top burner with a variety of kitchen tools around them and his sister’s arm in the corner]

What did we think?

  • Juliette: Julianna Banana was awesome! It was super fun and I really enjoyed  making the recipes. And the meals were so delicious (the strawberry shortcake was my favourite)! I’ll definitely make them again!

  • Quinn: Julianna Banana was good. It gave instructions that were easy to understand to make yummy meals that are just so good. My favourite recipe was the strawberry jam. I would do it again because it made cooking fun. I recommend it.

  • Mom:
    The variety of kinds of recipes and activities was great! Desserts, something that will last a long time (jam), a main course and things for gifting (jam and lip balm.)

  • I often think there aren’t enough activities that are easy for parents to do with their kid. This would make a great gift for a parent looking to have an activity for some quality bonding time.

  • Aside from a few moments where I had to let go of how the kids interpreted the instructions and let them do their own thing (because I was looking for something I DIDN’T need to be involved in 😀), it was amazing. The kids were able to make 3 very different recipes independently that all tasted delicious!

  • This was the first activity my twins have done together without arguing in a long time, and for that alone it was a great win!

3 jars of delicious strawberry jam made from scratch. Perfect for gifting, or, eating yourself if you’re these two! [Photo of two white 12 year olds standing in front of patio doors with a play structure and trampoline in the background, holding three jars of strawberry jam up while one gives a thumbs up]

3 jars of delicious strawberry jam made from scratch. Perfect for gifting, or, eating yourself if you’re these two! [Photo of two white 12 year olds standing in front of patio doors with a play structure and trampoline in the background, holding three jars of strawberry jam up while one gives a thumbs up]

How can you purchase one

You can sign up for the summer box, a bundle of three boxes, or individual online cooking classes from the Julianna Banana Web site. Summer boxes are ready for pick up and delivery this week!

Individual boxes are $65 and you can pick up at several locations around the city or for a fee have it delivered.

When you purchase the 3 box bundle it comes with free shipping in the Ottawa area.

We love working with Julianna Banana because the kids really do love the resources and all of the people we know who either purchased boxes or have taken classes have found them to be really well done and keep coming back to buy again. We also love that they are committed to supporting local and giving back to local charity. They are currently fundraising $3000 from Culinary Boxes and Classes for the Ottawa Network For Education.

Check them out!

Please note, Julianna Banana is a Kids in the Capital sponsor and we were provided the summer box. All thoughts and feedback are based on our personal experience with the box.

What is an Instant Pot? And why I (finally) bought one.

Before Black Friday 2016 I had never heard of an Instant Pot. But that day my newsfeed was filled with posts about how great the Instant Pot is and how it saves people time and money—and how Amazon often puts it on sale. I didn’t buy my Instant Pot that day. I thought it was a trend like so many other kitchen gadgets out there, and I’m not one for fads.

Fast-forward to Boxing Day and once again, my newsfeed was filled with posts about Amazon’s great price on this product. I am an avid slow cooker user, and read that the Instant Pot could replace a slow cooker—this intrigued me. I was growing tired of how heavy my slow cooker is, and my tendency to overcook things in it. It was because of this that I decided to do some research on the Instant Pot. I quickly learned it is a slow cooker, pressure cooker, rice cooker and so much more—all in one.

Needless to say, 1.5 months ago I bought an Instant Pot IP-DUO60 7-in-1 Multi-Functional Pressure Cooker, 6Qt/1000W and I haven’t used my slow cooker since.

Why I love the Instant Pot

1)   Quick meals

If you have a busy household, then you will appreciate the ability to have homemade chili on the table within one hour of your first onion chop (and it will taste as though it was cooking all day long—see below).

2)   Flavourful food

I have yet to make anything in my Instant Pot that isn’t flavourful and tasty; just as it would taste had it simmered in a slow cooker all day long.

3)   Healthy cooking

Just as a slow cooker encourages home cooking, so does the Instant Pot. I love being able to cook real food and having it ready in a minimal amount of time. The Instant Pot allows you to serve healthy meals without having to rely on packaged convenience food.

4)   The sauté feature

To be completely honest, I was sold on the Instant Pot from the moment I realized I could brown the meat and caramelize the onions in the same pot as I cook the chili—one pot cooking. This convenient feature saves time and dishwater!

The Instant Pot’s learning curve

Before I owned an Instant Pot I had never used a pressure cooker, so the functionality and capabilities of this feature confuse me. I am still not sure as to when I should let the Instant Pot “naturally release” the steam versus letting the steam out myself. I usually underestimate the time it takes the Instant Pot to naturally release the steam and the lid will not open (for safety reasons) until all the steam is released from the pot.

Also, the heat and pressure of the manual steam release is quite loud and forceful, so I advise against trying to have a conversation while doing this. I also suggest moving the Instant Pot away from kitchen cupboards since the hot steam can do damage. I have heard of some Instant Pot owners buying PVC piping to redirect the steam away from the cupboards—this is on my to do list.

Knowing how long to cook some meats and meals can be difficult to determine—also knowing it takes 5 to 10 minutes for the Instant Pot to heat up is helpful when planning to have supper on the table by a certain time. Luckily, the Internet is a great resource for timing, recipes as well as cleaning tips for the Instant Pot. There are many bloggers (my favourite is This Old Girl) as well as Facebook Groups devoted to the Instant Pot.

Tried and tasted Instant Pot recipes

With the exceptions of modern additions or changes, I have made the following Instant Pot recipes with great success! My daughter loved all of them. She prefers one pot spaghetti to the traditional kind now.

Chili
Hearty hamburger soup
One pot spaghetti
Apple spice steel cut oatmeal
Whole chicken

Instant pot steel cut oats

The recipe below is one of my own. I like my pork chops tender and this recipe makes them as tender as they get and my daughter likes her pork chops sweet—so this recipe is our go to when it comes to pork chops.

Kid Friendly Sweet Pineapple Pork Chops

4 pork chops, boneless
Salt & pepper

1 cup of fresh pineapple; cut into widgets
2 tbsp. of soya sauce
¼ cup of honey
2 tbsp. maple syurp
3 tbsp. Dijon mustard
½ teaspoon freshly grated ginger
½ teaspoon of cinnamon
¼ teaspoon of ground cloves

  1. Set Instant Pot to sauté and drizzle with olive oil to prevent pork chops from sticking.
  2. Season both sides of the pork chops with salt and pepper and place in the inner pot.
  3. Brown pork chops on both sides/
  4. In a small bowl, combine soya sauce, honey, Dijon mustard, maple syrup, ginger, cinnamon and cloves.
  5. Pour sauce over pork chops, covering them as much as possible.
  6. Lock cover into place; seal steam nozzle.
  7. Set to manual setting for 15 minutes.
  8. Naturally release pressure for about 5 minutes.

Serve with rice and your favourite vegetable. This recipe is at is says–sweet, so kids will like it. 

Many slow cooker recipes can be modified for the Instant Pot. Its pressure cooker capabilities are phenomenal and not as intimidating as your traditional pressure cooker. If you are unsure how your cooking skills will transfer over to the Instant Pot start with something simple like hard boiled eggs, which seems to be a popular stepping stone into the Instant Pot world.

Do you own an Instant Pot? What are some of your favourite recipes? I’m always looking for more recipes, so please share them in the comments below.

Kid Approved: Recipe for Non-Dairy Yogurt

We're doing a food experiment in our house. We've long suspected that our daughter has some allergies (or, at least, intolerances - these are not life threatening). But we've been too tired and lazy to change much, other than limiting the amount of cow's milk that she drinks. She still consumes most other dairy products. We recently embarked on a strict diet with her, cutting out all dairy and any trace dairy in other foods (including casein). Lo and behold, we saw an improvement.

Despite the positive changes, I was finding the new diet a struggle. Our daughter's favourite foods include: cheese (all types), yogurt, sour cream and butter. She eats fruit, veggies and protein as well, but not with the same gusto.

So, my challenge has been to find some alternatives that are both tasty and don't break the bank. So far our one success has been fake butter. And no, I'm not talking about chemically-laden margarine laced with milk products; I mean this stuff - Earth Balance. Dairy-free AND soy-free, and given the thumbs up by picky kiddos everywhere!

Other products have been a giant failure. She hates Daiya "cheese," although we haven't tried to make pizza with the shredded variety yet. Another score for the garbage was coconut "yogurt." Blech!! It was jelly-like, a weird pale grey colour and FULL of sugar and additives. She also shunned my homemade almond milk, and still prefers the store-bought variety.

The holiday season arrived. We gave up for a couple of weeks and let her eat whatever she wanted, because food was everywhere, and I was tired of having nothing to offer her for snacks and/or lunch. There's only so much fruit, nuts and vegetable with hummus you can offer a kid before they ask for cheese and crackers.

Christmas day came, and Santa surprised me by leaving a big wrapped box under the tree. Inside I found a Blendtec blender, a kitchen gadget I've been swooning over for a while now. Other people spend hundreds of dollars on hair treatments, gym memberships, Ipads, Iphones and giant TVs. My weakness is kitchen gadgets.

Can I just say, this blender has truly changed my culinary life. Things that I've always dreamed of doing, I can now do in a matter of minutes!! I can make amazingly healthy smoothies, without all the floating chunkies that my hand-held blender used to leave. I can make all my own coconut milk and almond milk, and I can even blend up my favourite drinks (mmmm pina colada!!)

I've also discovered CASHEWS!! Almond milk is totally yummy, but a bit of a pain to make because you have to squeeze it through a nut bag (no, I'm not making this up). But cashews don't take any time at all. You soak them overnight, whiz them up with water, and voila!! Yummy, creamy, awesome milk. And the more digging I did, the more I discovered what I could make out of cashew milk.

In this post I'd like to share my successful Cashew Yogurt, adapted from this recipe at The Spunky Coconut.

First Step

Make the cashew milk! Soak nuts in water overnight, and then drain and rinse. Put them in your food processor or blender. Add 4 cups of water, 1/2 tsp vanilla and 1tsp honey. Blend until smooth and frothy.

Second Step

Bring the 4 cups of cashew milk to a simmer in a saucepan.

Third Step

Whisk in 2 tsp of Gelatin dissolved in boiling water (one packet of Knox Gelatin worked for me). The instructions of how to dissolve the gelatin are on the packet. The Spunky Coconut mentions a substitute for vegetarians, but I haven't tried it, so not sure if it would work.

Fourth Step

Let the milk cool until it reaches about 90-92 degrees F (having a good book nearby to wait while it's cooling is a good idea, or just put the whole pot in the sink with cold water)

Fifth Step

Whisk in 3.5 tsps non-dairy probiotic. I used Inno-Vite DDS Original powdered probiotics. Basically, you need about 30 billion colony forming units, so just read the label on your favourite probiotics.

Sixth Step

Put the yogurt into a yogurt maker, oven with the oven light on (I have a "proof" setting on my oven), or in a cooler with something to keep it warm in there....hot water bottles etc. I've heard the yogurt maker is the easiest, but it's one gadget I don't own. Leave the yogurt overnight.

Seventh Step

In the morning, pour the yogurt (it will still be quite runny) into a container and refrigerate. When it is completely cool, it should have set and be thick and yummy. Sweeten with maple syrup, add fruit, vanilla, whatever!! Enjoy!

Misty Pratt is a mother of two girls, 1 and 4 years old. In her spare time she is a doula and childbirth educator. Follow her on Facebook or find out about her services here.

Going Bananas Over Allergy-Free Desserts (egg/dairy/nut/sesame/soy/wheat/gluten-free)

by Meghan Allergy-free and kid-friendly can pose a real challenge in the food department. When it comes to kid-friendly and allergy-free desserts the choices are limited unless you want to spend a lot of time in the kitchen. Allergy-free baking can be tricky (as with regular baking) and a lot of moms want easy – not everyone is a Martha Stewart.

It is difficult to find easy pre-made allergy-free desserts as they usually cater to only one food allergy or they are ridiculously expensive. I remember bringing home a $30 allergy-free cake to treat my family only to have my 3-year-old exclaim it looked yucky and the baby toss it on the floor.

When you want to treat your little ones and you don’t want all the mess/work, I say grab a banana. I live with a bunch of monkeys, so bananas do not last in the fruit bowl. I end up making a second trip to the grocery store to replenish what was eaten. Even the pickiest of eaters seem to be okay with a banana, so why not make a quick dessert from it? You can even get your picky eater involved!

Now you may wonder how a simple banana could be transformed into an easy dessert without just looking like a boring banana – “yippee mom, bananas again for dessert”.

Here are 5 ways to get your kids going bananas for these banana inspired allergy-free desserts:

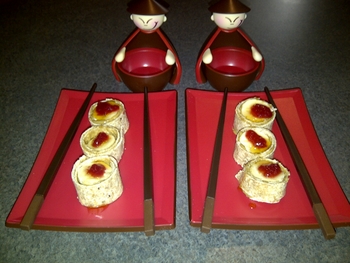
Banana Sushi

As adults, we just love to use chopsticks even though we could take the simple route and grab a fork. My oldest daughter is fascinated by chopsticks, but wouldn’t touch real sushi. When she saw that I was rolling up some bananas for dessert, she was ready to use those chopsticks.

Directions: Slice 1.5 inch wide strips of a tortilla wrap. Spread sunflower seed butter (I use SunButter) on one side of the strip. Slice 1.5 inch piece of banana and place on one end of the buttered strip. You are then going to roll the banana into the strip. I topped each of the rolls with a little bit of raspberry jam to mimic fish eggs on real sushi.

Banana Boat

Why dirty a bowl when you have a banana?

Directions: Carve out lengthwise the top of the banana. Take a spoon and scrape out some of the banana and place in a bowl (you want to create a partially hollowed cavity in the banana). Mix 1 tbsp of brown sugar, 2 tbsp of oats, and 1 tsp of butter spread (I use Earth Balance – vegan) into the bowl with banana. Mash all together and place back into hollow cavity of banana. Top with dairy-free chocolate chips (I use Enjoy Life brand). Place in oven for 10 minutes at 375F (you can make a little stand from aluminum foil). Banana skin will turn a bit black, but insides will be all warm and gooey.

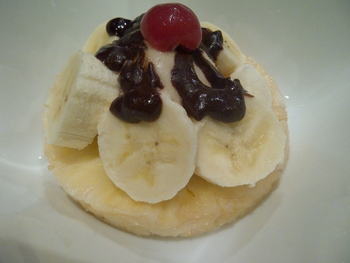
Banana Sundae

A simple summer treat!

Directions: Slice a pineapple and place ring at bottom of bowl. Place one scoop of sorbet in the middle of pineapple ring. Slice banana and layer around sorbet. Melt a few tbsps of dairy-free chocolate chips (I use Enjoy Life brand) with one tbsp of rice milk (or any other choice of milk) in microwave – stir. Pour chocolate sauce over sorbet and bananas. Top with a cherry.

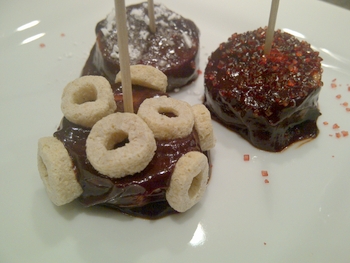
Banana Chocolate Fondue

Kids love to get involved and decorate.

Directions: Slice bananas in 2 inch pieces. Melt dairy-free chocolate chips (I use Enjoy Life brand) with rice milk (or any other choice of milk) in microwave – stir (1 tbsp of milk for every 3 tbsp of chocolate). Dip banana pieces into melted chocolate and place on plate. Put toothpick in top of banana piece. Let kids decorate with sprinkles or cereal.

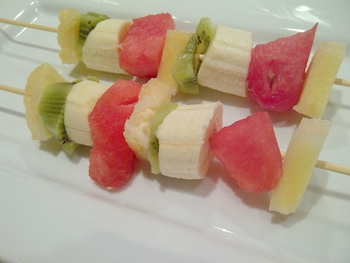
Banana Fruit Stick

The easiest and healthiest of all desserts, but children just love anything on a stick! My daughter wouldn’t touch kiwi, but since I put it on a stick next to the bananas, she didn’t make any mention of hating it.

Directions: Cut up bananas, watermelon, kiwi, pineapple, or any other fruit on hand and place on a skewer.

Meghan is the mother of 2 beautiful girls aged 1 and 3. She has been recently diagnosed with Ankylosing Spondylitis which is a form of arthritis. In the process she has discovered that diet severely influences her symptoms as she is intolerant to dairy, gluten, eggs, and corn. She blogs about her daily challenges with dietary restrictions at Bon Appetit Allergy Free Treats and you can also follow her on Twitter .

Nuts and Bolts - A Gift For The Snacker In Your Life

Looking for a little extra something for a gift basket?  Think that a tin of something snacky would be the perfect gift for the mailman or bus driver on your Christmas list?  Want a dish of something nibbly to leave out on the coffee table at your holiday gatherings?  The possibilities are endless!  (Or you could just make it and eat it all yourself!)

100_2736

This is such and easy recipe that it is a great for the kids to help. And you really don't have to have any cooking or baking skills to pull this off!

Nuts and Bolts

8 cups Cheerios 8 cups Shreddies 8 cups Corn Pops 2 cups pretzels 2 cups peanuts 3/4 cup of butter 2 tsp of each: salt, summer savoury, marjoram, garlic powder 1/2 tsp onion powder 1/4 tsp ground pepper

Start by layering half of each type of cereal , pretzels and peanuts in a LARGE oven proof pan, I use my large roasting pan. Then layer the other half of everything on top.

100_2740

Mix the spices all together in a small dish and then sprinkle on top of the cereal mix. Slice half of the butter in thin slices and place on top of everything. 100_2741

100_2743

Cover your pan, place in the oven at 250 F for 15 minutes. Remove from oven, mix well. I like to shake the roast pan and carefully turn it upside down and shake. Slice and add the rest of the butter on top. Place in the oven for 15 minutes. Mix well and put in the oven for a final 15 minutes. Let cool throughly before packaging or storing in air tight containers.

Put some in a Christmas tin from the dollar store and you've got a perfect little gift for someone. 100_2745

Our sixth winner of a Family Pass to the Canadian Mint is Sarah S!

If you leave a comment on any post for the duration of the giveaway, you are entered to win. Additional comments are not required and won't increase your chances of winning (though they are always welcome).

HOW TO ENTER

Royal Canadian MintWe are going to be giving out one pass a day for the next 6 days. To enter leave a comment on any one of the giveaway posts or tweet about the giveaway:

I’d love to win a family pass to the @canadianmint from #kidsinthecapital this holiday season!  http://www.kidsinthecapital.ca/?p=6655

Only one entry will count and you can only win once.

Winners will be picked each day from all comments and tweets received by 8:00pm. If you'd like to know more about this giveaway and the Canadian Mint, please read our introduction post.

Now, tell us your favourite edible gifts to give (or get)!?