
Encouraging Young Writers: Make a Writing Caddy
/by Valancy
Whenever I am writing a grocery list, my kids love to highjack my pen and paper and fill the page with their own scribbles. My son, who is four, enjoys making his own lists and telling me what each scribble means (usually his favourite foods that he wants to buy at the store). My daughter, who has just turned two, specializes in covering up my own words with ink first, and then filling the rest of the page with loops or a series of vertical lines.
I know that this enthusiasm for making their own marks is an important precursor to literacy and writing skills, and I’ve read the expert advice that says to encourage these developing skills by making writing materials readily available. The thought of toddlers and preschoolers with free access to Crayola can strike fear in the hearts of parents. Especially those with white couches. I had never really shared that worry when firstborn my son was younger, as he was naturally cautious and was very good about keeping his art more or less on the paper. His younger sister, on the other hand, tends to be a bit more carefree and experimental. I have to admit that over the past year or so I’ve reserved crayons and markers for supervised craft time exclusively, and then only in locations with surfaces from which crayon and maker are easily washed off.
However, now that my two-year-old daughter can (usually) be trusted not to draw on the walls and the furniture, I figure it is time to have some writing and drawing materials available whenever the kids wanted to use them. Looking around the internet for some inspiration on how to best organize the supplies and make them easy to access for the kids, I discovered this lovely writing caddy from PlayfulLearning.com
I love the fact that everything is neatly contained and organized, and the caddy is portable, so the kids could use it wherever they were inspired to write – at their own kid table in the family room, the coffee table in the living room, the kitchen counter, etc.
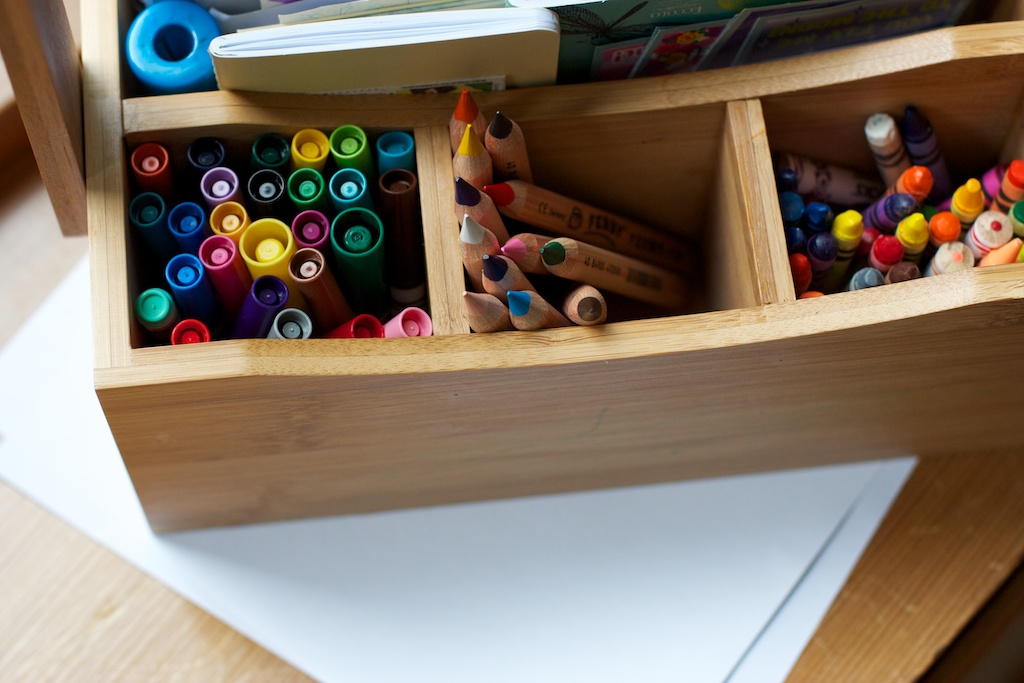
While you can buy this caddy, stocked or empty, directly from PlayfulLearning.com, it is a bit out of my budget. As a more affordable alternative, I bought an inexpensive cutlery caddy, and stocked it with art supplies that I already had on hand. I found this great bamboo caddy on Amazon.ca, which was perfect because it had one long cubby that is perfect for storing paper. (Tip: if looking online try searching for “cutlery” or “flatware” caddy.)
I did splurge and purchased some high quality children’s pencil crayons. These Lyra Ferby pencil crayons are short and fat, which makes them easy for small hands to grab, and the triangular shape is recommended by preschool and kindergarten teachers to encourage the development of the proper pincer grip. According to the manufacturer, these pencil crayons are also supposed to have rich colour lay-down and be resistant to breaking, and so far they’ve been living up to those promises. They really are lovely to draw with; they feel so silky on the page. I ordered mine online, but you can also find them locally in Ottawa at 3 Little Monkeys .
I also stocked the caddy with some small empty notebooks, loose paper, envelopes, old Easter Seals and World Wildlife Fund stamps, and other “treasures” from my stationary drawer. To help my son, who is starting junior kindergarten this year, practice his letters, I also found some free letter sheet printables online. (See below for links.)
Both kids loved their new writing caddy right away, and have been using it regularly since. Even my 26-month old will pull it off the shelf herself when she wants to draw, and both she and her big brother have been surprising good about returning the crayons and markers to the caddy after using them. There have been a few incidents with an uncapped marker too near the couch, but it really has been only a few times. Thank goodness for washable markers and easy to clean microfiber!
Free alphabet printables:
Uppercase & alphabet charts at PlayfulLearning.net: http://www.playfulearning.com/Playful_Learning/Writing_Playful_Learning_Experiences.html
Learning ABC’s worksheets from Classroomjr.com: http://www.classroomjr.com/learning-abc/
Individual letter alphabet handwriting practice sheets from Mywaytoo.com: http://www.mywaytoo.com/Pages/alphabet.html
Block printing alphabet practice worksheets from k12reader.com: http://www.k12reader.com/handwriting-practice-worksheets-block-style-print/
Traceable alphabet worksheets for preschoolers from Kidslearningstation.com: http://www.kidslearningstation.com/preschool/teach-printing.asp


 Have them add the washing soda and observe what happens to the oil. Adding detergents to the rivers etc keeps birds from being able to float properly.
 Experiment 2 – magnets
 Experiment 3 - forensics

 (my daughter loved this one and did her brother’s prints. We then labeled the fingers above the prints. This is also a great way to have a record of your child’s fingerprints!)


