
Activities to do With Older Kids: DIY Appliqued Duvet Cover
/by Jordan Over the Easter weekend, my husband Brian and I took on a giant project: an appliqued duvet cover. It sounds easy, but it turned out to be four days of ironing, cutting, ironing, cutting, and ironing…when we finished it, though, I realized it was also an awesome project for a kid’s room. So, if you have a crafting buddy, a ton of patience, and don’t mind ironing a lot, you may want to try this project out for your child. Just a note that this project is better left to the adults; surprise your little one with the end result. I picture this working particularly well for those parents out there whose kids are fanatical about a particular theme that is hard to find or overpriced to purchase.

Here’s how you can do this for yourself:
YOU WILL NEED:
- a duvet cover. We got ours for $14.00 with pillowcases, at IKEA. Cotton is probably best.
- scraps of fabric: felt, cottons, flannel
- buttons as accents
- Fabric glue: I love Aleene’s, if you can find it.
- iron-on adhesive interfacing
- scissors and sewing basics
- parchment paper or cardstock
- large surface to work on
- a co-pilot. This is a two-person job.
WHAT TO DO:
1. Prep your duvet cover by washing and drying it. Don’t use any fabric softener: it will interfere with your adhesives. When it’s dry, iron it out.

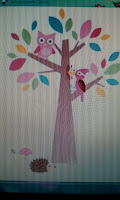
2. Choose a design (we got some ideas off the internet), and choose your fabric accordingly.
3. Start drawing out your designs onto the fabric and cutting. Practice placing the pieces out.
Keep cutting.

And cutting.
And placing.

4. Iron all your pieces perfectly. I recommend throwing on a TV show.

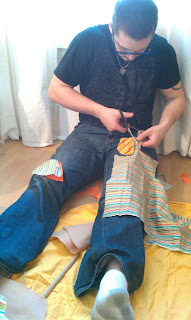
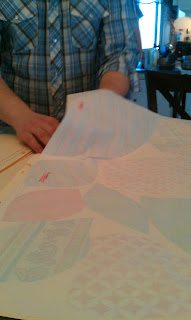
5. Lay out your big sheet of interfacing. We got a bulk roll at Fabricland for 16.00. Place your pieces on it. We were careful to squish everything close together, yet we still ran out of interfacing. (This is when the fabric glue steps in.)
![]()
6. Iron the interfacing onto the fabric. We couldn’t flip the sheets over without displacing all our placement of the fabric pieces, so we lay file folders (ie cardstock) over the top of everything and just ironed a little longer than directed. Worked great.

7. Cut out all those fabric shapes again. Yyyyyyyep, it’s as much fun as it sounds.
8. Lay out all your pieces on your duvet cover, likely on the floor unless you have the biggest table ever. Follow the directions for ironing your pieces down. Because we had extra leaves, and the branches of the tree didn’t fit onto the interfacing sheets, we used fabric glue for some pieces. In retrospect, I might have used it on everything if I could have guaranteed that I wouldn’t get any ‘wet’ looking spots. The interfacing is stiff and has a ‘crinkly’ quality that is unfortunate, but I think it’ll soften over time.

9. Finishing touches: Brian sewed the owl’s button eyes into place. We’ll have to re-iron a few spots on the tree trunk where the interfacing didn’t quite meld with the duvet cover. But other than that, it’s pretty freakin’ spectacular!

This project took at least 8 hours spread out over 3 days. There were points where we were snapping at each other, where we fought over who lost the scissors, and where my hands were literally coated in fabric glue. We also went over our intended budget: I thought I’d have enough fabric at home to make all the leaves, but it turns out I didn’t have things on theme. Between the plain  duvet cover set ($14), the fabric ($40 with lots left over) and the interfacing ($16), we spent $70 on this project. While I recognize that’s not much for a duvet cover, it’s a lot for a craft project that had a high chance of failing.
But, hurray, it didn’t fail. And now we have a personalized, on-theme bedding set that we absolutely adore. Because it’s surprisingly hard to find owl-and-mushroom themed bedding for grown-up beds. Perhaps you have an ‘old soul’ child, one that would prefer Paris-themed covers, or calculus-themed covers? Really, this project can be anything you want it to be. Just remember, if you make this with your spouse/partner, I can’t guarantee you’ll both emerge alive…or at least not with all your digits in tact.
*****
Jordan is one-half of the team that makes up Project: Priceless. Together, she and her husband, Brian, write The NEST. They are newlyweds living in Hintonburg/Wellington West--the artsy, hands-on, ultra-urban centre of Ottawa. They have no plans for kids, but do have a dog and plan to get another one when the time comes. In the meantime, they're blogging their married adventures together and have a particular fondness for DIY projects.


